Tag: freshwater

  • Chili Rasbora – Full Care Guide

    Chili Rasbora – Full Care Guide

    The Chili Rasbora (Boraras brigittae), sometimes called the Mosquito Rasbora, is a incredibly small fish, with vibrant colors, that enjoy schooling in large groups. Originally found in Indonesia, it has swept through the aquarium hobby and is loved by many fish keepers. Primarily red and orange in color, this little fish strikingly pops in well planted aquariums. This guide will provide information on Chili Rasbora care and breeding habits.

    Fish Information

    Chilli Rasbora do not get larger than .8 inches (2 cm). It is the perfect fish for aquariums that are 5 gallons or larger. A school should contain 6 individual fish or more. 6 to 10 Chili Rasbora should do well in a 5 gallon fish tank. Although the Chili Rasbora remains incredibly small, its colorful body and habit of schooling create beautiful movement and liveliness in a densely planted aquarium.

    Like many other rasbora species, this one primarily spends its time in the middle and top of the aquarium. It will occasionally swim at the bottom of the fish tank.

    Aquarium Requirements

    The Chili Rasbora is a tropical fish that does well in a large temperature range. It can survive in water temperatures between 68 and 82 degrees Fahrenheit, but 75 and 78 degrees Fahrenheit is the ideal range where it will thrive. It enjoys KH levels between 3 and 12 dKH and lastly does great in acidic water that has pH levels ranging between 4.0 and 7.0.

    This species of fish suffers terribly in new aquariums so only add them into already well established fish tanks. Once introduced and settled, they are quite hardy.

    Because of its small size, keep this fish in slow moving waters. They will be thrown around the aquarium when caught in fast moving currents. Providing many live plants and great filtration is ideal for this fish.

    Food & Diet

    The Chili Rasbora is small and remains small its whole life. It is very important to feed it food that it will be able to fit into its mouth. There are many options to offer this fish to provide it with a varied diet. Flake food can be taken and crushed into powder which makes it small enough for this fish to consume. Micropellets can be fed with little problems because they are designed for tiny fish like Chili Rasbora. Also, feeding daphnia, brine shrimp, and cutting up bloodworms are fantastic options to give this fish a varied diet. Providing many different food options will keep this fish vibrant and healthy.

    Tank Mates

    Chili Rasbora are easily outcompeted for food. Take pre-caution when choosing tank mates. The Chili Rasbora do exceptionally well with other small and peaceful fish in the aquarium. Do not keep them with larger or more dominate fish such as:

    • Platys
    • Mollies
    • Swordtails
    • Betta Fish
    • Angelfish
    • Large Mouthed Fish (Cichlids, Goldfish)

    Keeping Chili Rasbora in larger fish tanks is more than possible. They will thrive with fantastic fish such as:

    • Tetras (ember, neon, cardinal, green neon)
    • Rasboras (harlequin, green kubotai)
    • Endler’s Livebearers
    • Guppies
    • Celestial Pearl Danios
    • Corycats
    • Dwarf Gouramis

    The amount of fish that can be kept in an aquarium are determined by the number of plants in the fish tank, filtration, and physical size of the aquarium. A densely planted aquarium will be able to keep more fish happy over a sparsely planted one. A stronger and better filter will go a long way in allowing you to keep more fish in the enclosure. Larger aquariums aid in keeping water parameters stable when a fish tank is heavily populated. Regardless, do not cram too many fish in a fish tank.

    Shrimp and snails should do perfectly fine with Chili Rasboras even in 5 gallon aquariums. In fish tanks this small it is important to closely monitor water parameters because they are more prone to swinging which can be detrimental to both fish and invertebrates.

    Breeding

    Chili Rasbora will openly breed and produce offspring in aquariums. The males may become a bit more territorial during breeding periods and will also deepen its red and black coloring. After successfully breeding a female will appear rounder than the male and not pregnant females.

    Eggs will be laid on plants and decorations and will not be cared for by either parent. The best chance for survival for the fry are in heavily planted aquariums. The plants will provide the much needed cover the fry will need to reach adulthood. The parents are sometimes observed to eat the fry once they hatch from their egg.

    Final Comments

    The Chili Rasbora is fantastic for aquariums both large and small but fill the micro aquarium niche very well for keepers that do not have the space or money to spend on large aquariums. Their vibrant colors stand out in aquariums so they will always be able to be observed. Check them out if you get a chance!

    Image by JoKrimmel on wikimedia

  • Beautiful, Jet Black – Red Tail Shark

    Beautiful, Jet Black – Red Tail Shark

    With all the different and unique freshwater fish to choose from, the red tail shark is sometimes overlooked. Regardless, this fish is remarkably beautiful and highly recommended for fish tanks that will tolerate its lively personality. The black body and red tail are always a sight to see because this color pattern is not very common in fish. The red tail shark has a nice long lifespan of 5 – 6 years.

    Aquarium Requirements & Fish Compatibility

    The red tail shark will be around 6″ in length when it is full size. Although they do not get incredibly large, a fish tank that is 50 gallons or more is highly recommended when it is fully grown due to its aggressive nature. It should be the only red tail shark in the fish tank because it becomes highly territorial. Having other bottom dwelling fish such as plecos, rainbow sharks, and cichlids is also not recommended due to this fish’s aggression. The red tail shark does well with fish such as:

    It is encouraged to provide a lot of places for this fish to hide. The fish tank should be full of decorations, driftwood, rocks, and plants (live or plastic) to help curb the previously mentioned aggression. Adding many decor breaks the line of sight for this fish which can help mellow it out. They love hiding in caves and crevices and will fight for the ability to do so.

    The red tail shark does very well in temperatures ranging from 72 to 78 degrees Fahrenheit, KH levels between 10 and 15 and pH levels ranging from 6.5 to 7.5. Due to its aggressive personality the red tail shark’s care level is little more challenging compared to peaceful community fish.

    Feeding

    The red tail shark is an omnivorous animal so it will consume just about anything offered to it including vegetables such as cucumber and zucchini. Please remember to thoroughly rinse the vegetables before placing them into a fish tank and do not keep the vegetables inside of the aquarium for long periods of time because doing so may cause an increase in phosphate and nitrate levels. Besides vegetables, the red tail shark will go around the aquarium consuming algae that grows on rocks, plants, and glass.

    Other foods that are commonly given to red tail sharks are flake food and frozen fish food. The flake food is meant to provide the nutrients a red tail shark would acquire from algae in the wild and the frozen bloodworms will provide the protein required for the red tail shark. Using these will help provide a well rounded diet for your shark. Other fish will also happily consume these foods! They are not limited to just these two types of food. Flake food can be substituted with pellet food and bloodworms can be substituted with brine shrimp or krill. Krill is normally given to larger red tail sharks.

    Breeding

    Breeding is an incredible challenge for red tail sharks in an aquarium setting. This is mainly because they are intolerable of one another in aquariums at home due to the aquarium’s size limitation and the fish’s territorial personality. Large aquariums may be able to keep more but it is still quite a challenge to get these fish to breed.

    The only physical difference between a male shark and a female is that when matured, the female red tail shark will have an larger abdomen compared to the male. Otherwise the male and female sharks are identical.

    Final Notes

    The red tail shark is a fantastic fish to keep in fish tanks where the other fish swim in the middle to upper parts. Although they are not normally advertised as algae eaters, the red tail shark will remove some algae from aquarium decorations. Adding a few snails to help will be beneficial. Overall, this is a fantastic fish with very unique colors that are great for planted and regular freshwater fish tanks!

    Image by Astellar87 on wikimedia

  • 5 Wonderful Algae Eaters for Freshwater Aquariums

    5 Wonderful Algae Eaters for Freshwater Aquariums

    Finding the right algae removing crew can be hard, especially for aquariums that are smaller. This guide will focus on a broad spectrum of algae eaters. There will be information on fish, snails, and invertebrates. In my opinion these critters are some of the best at removing algae. Before continuing reading through this guide, check out common causes for algae growth in freshwater aquariums here.

    1. Bristlenose Pleco

    There are many different plecos that can be purchased for a freshwater aquarium but I feel the bristlenose pleco is one that is an excellent algae eater and it also doesn’t get incredibly large.

    The bristlenose pleco, also known as the bushy nose pleco, is a fantastic algae eater for aquariums that are 30 gallons or larger. They should not get any larger than 5″ in length unlike the common pleco that can reach sizes over a foot in length. Providing places to hide is important for this pleco to give it some privacy. A piece of driftwood is a good choice in decor that will provide cover for this fish.

    This fish is omnivorous and not a picky eater at all. The bristlenose pleco should easily sniff out food that falls onto the substrate and slurp it up quickly. Otherwise, they will most likely be clinging onto decor and plants eating algae that may be growing on them.

    They are quite easy to breed in captivity. Males when grown will have large bristles between its eyes and tip of its mouth. On the other hand, females will have small whiskers near her mouth. When mating the female will dispense her eggs on driftwood or other flat surfaces and the male will guard the eggs. It will take roughly 10 days for the fish to emerge from the eggs. Once the babies begin to swim it is highly recommended to move them into a separate aquarium so they can mature.

    The bushy nose pleco does best in aquarium temperatures ranging from 75 – 79 degrees Farenheit, KH levels between 6 and 10, and pH levels between 6.5 and 7.5. They’re a fantastic fish to have that works hard to keep algae at bay!

    2. Amano Shrimp

    Amano shrimp, for freshwater shrimp standards, are the tanks of algae eating. They do an excellent job rummaging through different areas of the aquarium eating algae that is growing and also consuming leftover food that fish may not catch during feeding times. They’re not the most colorful of animals but they’re great to look for and observe in the aquarium. They’re gaining more and more popularity in the freshwater hobby due to their size and ability to eat algae in smaller aquariums where plecos may be too large.

    Image by Atulbhats on wikiMedia

    Amanos are beasts! They grow to be about 2″ in size when they’re fully grown. Regardless for their size, they are recommended for aquariums 10 gallons or larger. Like stated above, they’re great for aquariums that are just too small for larger plecos. Providing plenty of hiding spaces is great for Amano Shrimp. and be sure to have a well established aquarium because invertebrates are far more intolerant of unstable water conditions compared to fish.

    This species of shrimp is omnivorous. They will happily nibble on algae, flakes or any other food that comes their way. They’re not picky at all when it comes to eating.

    Amano shrimp are incredibly hard to breed in captivity. It is not common at all for it to happen. It is quite a challenge to bring up young amano shrimp from egg to adulthood so we will not get into that in this article.

    These beautiful shrimp are fantastic for freshwater aquariums and they are also tolerant of aquariums with a little bit of salt in them. They should do perfectly fine in brackish water aquariums. Please only house them with peaceful fish that will not bother or try to eat amano shrimp. These fish are very versatile and do well in water temperatures ranging between 60 and 80 degrees Fahrenheit, KH levels between 3 and 10, as well as pH levels ranging from 6.0 – 7.5. They’re quite hardy for a species of shrimp and live a long life of 2 – 3 years!

    3. Nerite Snail

    Nerite snails are a remarkable species of snail to add into a freshwater aquarium. For the amount of algae removal a snail can achieve, the nerite snail probably does it the best. They will help remove algae from glass, substrate, plants, and everything in between. They come in very nice tiger striped or dotted patterns so they’re a nice looking snail to add into a fish tank.

    This species of snail will not be seen larger than 1 inch in size. They stay very small and are very easy to care for. An established aquarium is a good idea to have and remember copper is lethal to them and all other invertebrates. Most snails are great for aquariums as small as one gallon or larger. This species of snail like to wander so there is a chance that they will make their way out of the aquarium if the opportunity arises.

    Nerite snails are herbivorous and if on the rare occasion your fish tank does not have any algae in it, providing algae based food to keep your snail fed should be considered. Feeding nerite snails is not a very common occurrence but keep in mind they may need some food if your fish tank is spotless!

    The nice things about nerite snails is that they will not infest your aquarium with millions upon millions of spawns. They only successfully produce offspring in brackish water. They are perfectly fine being kept in freshwater as adults. The young benefit from having higher pH levels and more calcium in the water levels to promote shell growth.

    Nerite snails are pretty hardy for invertebrates. They do great in water temperatures ranging from 65 to 80 degrees, KH levels that float between 12 and 18, and pH levels between 6.5 and 8.3. They will not tolerate high levels of nitrates and as stated above, copper is lethal to them. Overall, they are fantastic for freshwater aquariums, brackish water fish tanks, and planted tanks.

    4. Siamese Algae Eater (Flying Fox)

    The Siamese Algae Eater sometimes known as the flying fox is an excellent algae eater for many different planted tanks. What they lack in vibrant color is definitely made up by its ability to eat large amounts of algae in an aquarium. This fish species is primarily gray/silver with a long black strip that runs the length of its body. The flying fox are recommended to be kept in small groups. They do much better together than alone.

    It is rare to find a flying fox that reaches its full length of 6″. It is more commonly found at a max length of 4.5 inches. Because of their size and desire for algae the siamese algae eater should be kept in aquariums that are 30 gallons or larger. This will give them more space for forage for algae and once grown provide plenty of space for them to explore and swim. Driftwood, rocks and broad leaf plants are recommended to have in the aquarium because this fish will perch on top of them and also graze on the algae growing there.

    Image by Ark on wikiMedia

    This fish is omnivorous so it will take in just about any food offered but it does an excellent job removing algae from aquariums. It should be fed bloodworms, flakes food, and pellet food.

    There is very little to no information on breeding habits of the flying fox.

    This fish is a little more sensitive to higher nitrate levels so a well established and stable fish tank should be available before introducing this fish. They do great in water temperatures ranging from 75 to 79 degrees Fahrenheit, KH levels between 5 and 10, and pH levels between 6.5 and 7.0. They’re an excellent fish to have and are very interesting to observe.

    5. Otocinclus

    Otocinclus is a very small algae eater that is sometimes overlooked when on the hunt for something that can help maintain an aquarium. These little fish are small, but in large numbers are great at helping maintain smaller aquariums. They will cling onto many different surfaces with their black and white bodies and go about their day munching on algae.

    Ottos are incredibly small and they will not normally grow larger than 2 inches in length. They’re an excellent little fish for nano aquariums. They do perfectly well in aquariums 10 gallons or larger. Keeping a little school of 6 or more ottos is highly recommended. Providing rock work and driftwood will create surfaces for algae to grow to give this fish something to graze on. It will also create places for this fish to hide in times of stress.

    Image by Cisamarc on wikiMedia

    It can be easily concluded that this fish is herbivorous. It will primarily feed on the algae that is growing in the aquarium but if none is available it is recommended to throw algae wafers or algae flakes into the fish tank for this fish to nibble on.

    Otocinclus does not normally breed in captivity. A varied and diet full of nutrients will be required to even consider having these fish breed. Rising water temperatures are a common occurrence to influence fish to begin mating. You can consider very slowly raising the water temperature to around 79 degrees Fahrenheit to help motivate this fish to mate. After providing this fish with nutrient rich foods, raising water temperatures, and having perfect water parameters the fish may breed!

    Ottos are very peaceful fish and should not bother any other fish in an aquarium. They will thrive in aquariums with water temperatures ranging from 74 to 79 degrees Fahrenheit, KH levels between 6 and 10, and pH levels between 6.8 and 7.5. They’re a fun fish to observe and great when kept in schools!

    Final Thoughts

    Choosing the best algae eaters for your aquarium could be a challenge and hopefully this guide will give you a little insight on 5 fantastic critters that are great for cleaning up algae in freshwater aquariums. I would even recommend having a mixture of some of these if your aquarium has the space. There are definitely other fish that will destroy algae but I believe these are some of the best!

  • Freshwater Angelfish – Complete Care Guide

    Freshwater Angelfish – Complete Care Guide

    Freshwater Angelfish, sometimes called tropical angelfish are quite a popular and common fish in the freshwater fishkeeping hobby. They become large and can be the centerpiece of many fish tanks. There is nothing like a mated pair of angelfish swimming side-by-side in a fish tank. They are part of the cichlid family but look a little different with their unique arrow shaped bodies. You can find Freshwater Angelfish for sale at most pet stores and online. This guide will help provide more information on freshwater angelfish and the proper care to keep these fish happy.

    Aquarium Requirements

    There are fish in the saltwater hobby that are also called Angelfish. They have a much different shape from this species and aren’t related. I wanted to point that out for newer fish keepers. Technically speaking, there are both freshwater and saltwater angelfish but these Angelfish live ONLY in freshwater.

    How Big do Angelfish Get?

    Due to its unique body size an Angelfish should be kept in an aquarium no smaller than 30 gallons but a 55-gallon tank is even better for their size. Taller aquariums are preferred because these fish can grow to be roughly 8″ tall and 6″ long. They need plenty of room to turn and maneuver and anything smaller just doesn’t cut it.

    Aquarium Decorations

    Angelfish love having driftwood in their enclosure which helps soften and acidify the water. These fish also love heavily planted aquariums with quite a bit of open space for them to swim. They have long, showy, and delicate fins so it is important to find a balance of open swimming space and decorations.

    Water Parameters

    Freshwater Angelfish are quite hardy and easy to care for. They can handle a nice range of water parameters. The following are ranges that Angelfish are typically kept in:

    • Temperature Range: 75-82° F
    • KH Range: KH 1-5
    • pH Range: pH 5.8-7.0

    These fish do best in waters that are little more acidic. That is partly why they do very well in planted aquariums. Make sure fish kept with angelfish have the same or similar water parameter requirements.

    Veil Angelfish Swimming

    What do Freshwater Angelfish Eat?

    The Angelfish is not a very picky eater but they should be given a variety of foods. They are omnivorous so providing both algae and meaty food will be very beneficial to them. Remember to adjust the food size appropriately depending on the size of the fish. Also, like many other fish, an angelfish will attempt to eat anything that will fit into its mouth. Be mindful of keeping small fish and shrimp with a full-grown angel because they can become a quick snack. Freshwater snails and larger fish should be perfectly fine around angelfish.

    Tank Mates for Angelfish

    Freshwater Angelfish types vary in color, shape, and size. There are Zebra Veil Angelfish, Blue Angelfish, Koi Angelfish, and much more. Each should do just fine with one another, it all depends on your preference in color.

    Angelfish are considered semi-aggressive but are a more peaceful cichlid species. They usually will become aggressive when fighting for territory and mates. As stated above, they have the potential of eating smaller fish and shrimp but do fine with larger fish. Other than that, they don’t usually bother with anything else. They do great with Discus fish, Parrotfish, larger tetras, Denison Barbs, and many other fish.

    When angelfish are small they are commonly kept in larger groups. Once they become larger and mature, they will begin to pair off from one another. It is important to identify a pair and house them together in their aquarium because once they decide to lay their eggs, the pair will bully and fight any other fish to protect the eggs. It is possible to purchase a pair directly from a store, or just have one or two angelfish in an aquarium together but once it is time for them to breed no more than 2 should be housed in a fish tank.

    How to Breed Freshwater Angelfish

    Angelfish are quite commonly bred in the aquarium hobby. They will lay quite a bit of eggs and will defend them with their lives! To breed angels, you first need a pair. Once they are paired up, it is important to provide a flat piece of decor for them to drop their eggs on. The piece can be something like a piece of slate. It should be placed in an area with moderate flow. The eggs require flow to help prevent fungus growth which can ruin the batch. If everything is suitable for the angelfish, the female will drop the eggs and they will adhere to the piece of slate, and the male will follow behind and fertilize the eggs.

    There are many opportunistic fish in the aquarium lurking and waiting. Once they spot eggs they may try and eat them. The angelfish will do their best to protect their brood. After hatching it is important to feed the fry baby brine shrimp until they can eat crushed flake food.

    Final Notes

    Angelfish are wonderful fish that are pretty easy to care for. A pair can be a gorgeous centerpiece for many large aquariums. Their long fins and gentle movement give them a majestic appearance. They are quite easy to breed and for a cichlid are pretty docile. There are many breeders out there with many different variations available such as the Veil Angelfish, Koi Angelfish, Marble Angelfish, and more! Check them out and consider picking up a pair of your favorite!

  • Putting Together Your First Freshwater Jarrarium!

    Putting Together Your First Freshwater Jarrarium!

    Putting together a jarrarium, as simple as it may seem, can be intimidating at first. Luckily, once all the material is collected it becomes really simple. It seems to be a growing hobby and it is quite a lot of fun to put together. This is a step-by-step jarrarium guide that will hopefully give you a good idea of how to put together an eye-catching jar.

    Due to their small footprint, a jarrarium will begin to look quite cluttered when adding equipment. A preset heater is highly recommended to help keep a stable water temperature, but it is not required if your residence is consistently at a set temperature. Adding filtration is not too common. Many jarrariums rely on water changes to maintain good water quality.

    Step 1: Finding a Container

    We of course need to begin with acquiring a jar for the new jarrarium. Glass containers are most commonly used. I have seen old glass bottles, vases, ice buckets, and so many more things used as a jarrarium. I do my best to have my jar be at least 1 gallon but smaller or larger is always a possibility.

    The most important thing is to make sure that the container is clean! DO NOT use soap when cleaning. At most use vinegar and then thoroughly rinse the container. Once the container is ready we can move on to the next step.

    Step 2: Adding Soil

    Once we have the glass ready it is time to add some soil! I would recommend adding organic soil with compost into your jar. Avoid soils with fertilizer because it may add undesirable nutrients to your jarrarium. Also, certain soils with fertilizers may not be good for the inhabitants of your new jar. While adding the soil be sure to compact it down in an attempt to remove any air bubbles. About an inch of soil should be present once it is compacted.

    Once the jar is up and running it is highly recommended not to disturb the soil portion of your setup. In a few steps we will be adding a “seal” to prevent the soil from getting out but for now, let’s move onto adding the hardscape.

    Step 3: Adding the Hardscape

    Many different types of hardscapes can be used for a jarrarium. I used a piece of driftwood when I was putting together this one. Be mindful that it is preferred to boil or soak your driftwood before adding it into an aquarium or jarrarium otherwise, it runs the risk of releasing tannins into the enclosure. The tannin is not dangerous but it causes the water to look yellow or brown for a long period. Large pieces of driftwood can be used or spindly spider wood can be used.

    Rocks are also commonly used for an enclosure. Be mindful, because rocks that are made of limestone will raise your pH and water hardness levels, which may be undesirable when keeping live plants. Common rocks that are used are river rocks or lava rocks. Check out local fish stores for rock options.

    Lastly, a jarrarium can have any aquarium decor that will fit into it for decoration. A tiny pirate ship, skulls, pillars, etc. are fair game but make sure that it will fit or at least not crowd the whole enclosure. With any of the decorations, make sure that it is firmly touching the bottom of the jar for stability.

    Step 4: Adding the Seal

    Now is the time to add substrate to seal the soil. I recommend adding 1″ of a substrate on top of the soil. In this jar, I used Fluval Stratum, but other substrates can be added such as the Eco-Complete planted aquarium substrate!

    The substrate will seal the soil in place to help prevent it from floating up and leaching nutrients but it will also allow plant roots to reach down there and use what nutrients are in the soil. We will have to be careful when adding water to not disturb the soil and substrate!

    Step 5: Adding a Portion of Water

    Steps 5 and 6 can honestly be interchanged. I chose to add roughly a third of water into the jarrarium before adding plants. I did this to see whether my substrate sealed the soil correctly and I also wanted to have some water in the jar before adding plants. As stated above, be sure not to allow your substrate to be disturbed! You do not want the soil to get kicked up.

    Allow the water to run down your decoration or create a strainer to let the water trickle down. A cheap way to make a strainer is to poke holes in the bottom of a plastic bottle and pour the water into there. The water will probably get a little murky. After a few days, most of the murkiness should settle.

    Step 6: Planting

    Adding plants is probably my favorite part of putting together a jarrarium. It brings the enclosure to life! You can always experiment with many different plants but to start I would recommend adding a low light Anubias, some riccia for the foreground, and perhaps some java moss. This is a great way to dip your toes into keeping live plants in an aquarium-type setting.

    In this enclosure, I have dwarf hair grass and moss but I am only experimenting to see how well they do. If they do not grow well I may swap out the dwarf hair grass with an easier-to-keep plant.

    Step 7: Filling to the Top

    Now it is time to finally fill this jarrarium to the top! Use your strainer or piece of decoration and slowly and gently fill it with water. Once the water has reached your desired height, you are done with setting up your new jarrarium!

    The jar may be murky or discolored. Give this a few days to pass. The substrate and the tiny soil particles will settle and the coloration should clear up! Throw in a few pieces of fish food to begin the nitrogen cycle and begin considering what livestock to add to the enclosure. Also, consider adding an artificial light source and avoid having your jar too close to a window. A light fixture with a CFL bulb will suffice. There isn’t a need to go out and spend hundreds of dollars on a light fixture. Being so small with the potential of having swinging water parameters we will be limited to what can be added to the jar. I would only recommend small shrimp and snails for anything smaller than 5 gallons. At 5 gallons a betta fish could be added with a heater.

    Final Notes

    There are a few things I would highly recommend purchasing when setting up a jarrarium or any aquarium for that matter. An API Freshwater Master Test Kit can be used to keep track of ammonia levels, nitrates, and so on. This is important for really small enclosures such as this. It is also important to have while your jarrarium is going through the nitrogen cycle which takes roughly 6 weeks. During this time we will allow the food we threw in to decompose and we will not add any livestock. Only top off the water as it evaporates and do not replace any water during the cycle. The nitrogen cycle is completed when your test kits read 0 ammonia, 0 nitrites, and a hint of nitrates (10 ppm).

    A water conditioner, like the API Tap Water Conditioner, is recommended if using tap water to remove unwanted chlorine from your water. This will help make the water stable for your little critters. Other than that, just a few things like shrimp food, nets, and buckets should be kept. Lastly, enjoy experimenting with your new jarrarium! Hopefully, this guide gave a good idea of how to put one together!

    Check out this video of me putting together this jarrarium:

  • The Amazing Electric Blue Crayfish

    The Amazing Electric Blue Crayfish

    The Electric Blue Crayfish, sometimes known as the Florida Crayfish has popped into popularity in the freshwater aquarium keeping hobby. Their remarkable vibrant blue color sticks out like a sore thumb in any aquarium. They’re quite easy to care for as long as certain conditions are met. This guide will go into more detail on proper crayfish care.

    Water Parameter Requirements

    Like many invertebrates, these crayfish need good water conditions. Your water should not have any ammonia and nitrites. It is almost impossible to have a reading of 0 nitrates due to decomposing food and fish waste so having a nitrate reading of 10 or less shouldn’t be a problem. The goal is to keep very stable water conditions for your wonderful crayfish!

    A few other water parameters that should be mentioned are pH, water temperature, and water hardness. They are quite versatile animals and they do well in a wide range of water conditions. They will do just fine in pH levels ranging from 6.5 – 7.5. They shouldn’t have a problem with water temperatures ranging from 65 – 75 degrees Fahrenheit but catching the temperature in the middle is ideal. Lastly, a water hardness level ranging from 3 to 10 dkh is just fine for these large invertebrates. An API Freshwater Master Test Kit and an API GH & KH Test Kit are great to have on hand for any aquarium.

    Crayfish Care

    An electric blue crayfish is pretty easy to care for. I wouldn’t recommend keeping them in anything smaller than a 30-gallon aquarium because they will be 4″ – 6″ long when they are fully grown! They have a life span of 5 to 6 years as long as they are living under stable water conditions. Be mindful that these invertebrates will shed their exoskeleton as they grow out of it!

    Electric Blue Crayfish are not picky eaters. They will eat just about anything that comes their way whether it’s flake food, pellets, or anything else. I would recommend dropping a few algae wafers to keep them busy and fed. Be cautious as to what fish to add to the aquarium because a slow fish or fish that lingers at the bottom of the aquarium will become a quick meal for the crayfish.

    I would not keep them with live plants. I have heard quite a bit of horror stories of these invertebrates taking plants, uprooting them, and munching on the leaves. I would recommend keeping them with plastic plants and decorations with caves varying in size. In their natural habitat they burrow so imitating a “burrow” is ideal for this creature. Otherwise, they do not require much else.

    Animals that can be kept with Crayfish

    This is a gray area because a lot of things can become a meal for the crayfish but there are fish that do much better at staying alive in the same enclosure than others. I would not keep fish that dwell at the bottom of the aquarium or that are slow. For example, keep these guys away from slow-moving Goldfish and bottom-dwelling Cory Catfish.

    Fast-moving fish that spend most of their time in the center of the aquarium or at the top are ideal for a crayfish enclosure. Danios are great because they move incredibly fast. Certain rainbowfish are incredibly fast and hang out at the center of the aquarium. You cannot go wrong with hatchet fish because they stick to the top of the fish tank. Be mindful of the fish you add with a crayfish! Snails should be okay to have with crayfish and are useful for keeping algae away from your aquarium.

    Final Thoughts

    Electric Blue Crayfish are a fantastic animal to keep. Watching them move their legs, collect food, and dart away backward from time to time is a fun experience. They have a good personality and are easy to care for! If you’re thinking of setting up a new 30-gallon (or larger) aquarium, check these out!

  • 3 Easy to Care For Aquatic Plants for Freshwater Fish Tanks

    3 Easy to Care For Aquatic Plants for Freshwater Fish Tanks

    From Plastic To Live Plants

    Having a thriving freshwater-planted aquarium is what many hobbyists strive to achieve. It is an incredible learning curve from owning a fish tank with fake plants and decor to a lush underwater garden filled with live plants. Many different measures must be considered when adding live plants into an aquarium. Primarily lighting requirements and a plant’s supplementary needs. Before really diving into all the different aquatic plants that are available check out the 3 plants that I believe are excellent for beginner plant growers. If you’re a pro at keeping plants and want to test your skills, check out 4 Beautiful Expert-Level Plants.

    1. Anubias

    There are many different varieties of anubias out on the market ready to be scooped up by aquarium keepers. Most, if not all, are incredibly hardy and do well in mid to low-light fish tanks. The anubias usually does quite well without any special fertilization or CO2 systems. They don’t even need to be put into the substrate.

    Image by Colamc on wikimedia

    The anubias can easily be put into driftwood or wedged in between rocks. They’re excellent starter plants for beginner-planted tank keepers. The plant has very broad leaves and helps create a unique structure in an aquarium setting. Check out this guide on anubias care.

    2. Java Fern

    Java fern is an excellent starter plant for aquarium keepers. They are a great mid-ground plant that will do perfectly well living in moderate to low lighting, just like the anubias. Java fern is considered an “amphibious” plant because it can live partially or fully submerged. This plant spreads mainly through rhizomes and can happily take over parts of your aquarium if not managed properly.

    Image by Fhurzan on wikimedia

    Finding plants that do well with South American cichild’s lively personalities is sometimes hard but java fern should do alright with those gloriously tough fish. It can also be placed on driftwood or in between rocks although it is not as commonly done as with the anubias.

    3. Crypts

    Cryptocoryne otherwise known as crypts are also a fantastic and easy-to-grow plant for a beginner dipping their toes in planted fish tanks. Cryptocoryne Wendtii is more or less the one I am specifically talking about. This plant grows very well in low to medium lighting and it spreads wonderfully through rhizomes.

    Image by S. Tanaka on wikimedia

    I had one that spread rhizome from one side of the aquarium to the other. Its leaf coloration will range from green to red to brown which is dependent on how much light it receives and amount of nutrients in the water. It is a plant with a lot of variability and will add quite a bit of personality into your aquarium.

    Final Thoughts

    These 3 species of plants can do very well with as little as good lighting, a substrate, like Eco Complete Planted Substrate, and fish waste! If they are in your aquarium and they seem to not be doing well test your water with an API Freshwater Master Test Kit to make sure your water parameters fall within your plant’s range.

    Depending on the amount of fish in your aquarium, there may not be enough natural fertilizer (fish poop) to keep your plants happy so consider providing some liquid fertilizer such as Seachem Flourish which is an all-around supplement for plants, and Seachem Flourish Excel which is a CO2 supplement. There are many other fertilizers out there but this is a good start for supplementation. Read the instructions carefully because adding too much Flourish will cause algae blooms and too much Flourish Excel can cause harm to your fish because it is practically CO2 in a bottle!

    Image by úlfhams_víkingur on wikimedia

  • Setting Up a GloFish Specific Aquarium

    Setting Up a GloFish Specific Aquarium

    Setting up an aquarium can be as simple or as complicated as you would like to make it. This will be an in-depth guide on how to set up a fish tank specifically for Glofish Tetras and/or Glofish Danios. This guide is primarily for beginner aquarists who are dipping their toes into the hobby or for parents who need guidance on setting up an aquarium for their children. For some quick information on GloFish check out this guide!

    We will be using a 20-gallon aquarium as a point of reference for this setup guide. A fish tank this large will allow you to keep a few more fish and a larger water volume will help keep water parameters stable. Under normal circumstances, an inch of full-grown fish per gallon is the recommended ratio for keeping fish in an aquarium. GloFish Tetras and GloFish Danios max out at 2.5 inches. This will allow you to keep either 8 tetras or danios. This is great because both are schooling fish and it’s recommended to keep at least 6 to consider it a school.

    Equipment Required

    No matter what type of aquarium you set up, you’ll likely need at least one piece of equipment to keep it running. Once you become a pro, you are welcome to change things up and tweak the equipment to your liking. However, if you’re new to fish tank keeping, I recommend following along to learn about the equipment I recommend for your fish tank.

    Aquarium Heaters

    We will need a heater. The 75-watt Eheim fully submersible heater or the Fluval M100 Submersible Heater are great choices. These heaters are fully submersible so you can easily hide them behind the decor. Also, they can be calibrated to the desired temperature using the dial at the top. As with any piece of equipment, it can come faulty or become faulty over time. I highly recommend purchasing something like the Penn-Plax Therma Temp Floating Thermometer to keep an eye on the temperature in case your heater decides to fault out. If you need more heater suggestions, take a look at some of the Best Heaters for Freshwater & Saltwater Fish Tanks!

    Filtration System

    A good filter is always recommended. My preferred filter for a setup like this is the Aquaclear 30 Power Filter. I like this one because it has three different compartments where filter media can be added. It comes included with a sponge, carbon, and biomax. First, the sponge catches debris. The sponge will require replacement eventually but rinsing it in aquarium water during water changes will keep it going for a while.

    Second, the carbon absorbs nutrients and will need to be changed once a month. Lastly, the biomax creates a bacteria haven which is important to aid in keeping a stable aquarium. These can be swapped out with other filter media but they are also perfectly fine to use for your Glofish aquarium. Unlike other filters, this one maximizes the space to assist in keeping your water clean!

    Aquarium Lighting

    Blue lights are what will make your Glofish pop in color. We will need a light that can be set to just blue lights to make your fish glow! Fancy lights can get expensive. Luckily there are budget lights that should do the trick for this kind of setup. The Hygger 18w Aquarium LED Light will provide you with both normal lights (to help live plants grow) and a setting to let only the blue lights shine.

    If you want to go all out and splurge on a more elaborate light the Current USA Satellite Plus Pro LED Fixture is a great choice. It comes with a controller which allows you to program the lights and also use preset settings to create different effects like cloud cover and storms. Purchasing this light will also give you the ability to grow more difficult plants in your aquarium if you ever decide to go that route.

    Optional Equipment

    Aquarium Air Pump

    An air pump is not a requirement but it adds a cool effect to the aquarium. Connecting it to compatible decorations or creating an enormous bubble wall creates a more unique aquarium experience.

    Auto Feeders

    Auto feeders are not usually something I recommend but they are also an option for anyone who travels and isn’t always home to feed the fish. I don’t normally recommend them because they will at times overfeed or dump most of the food at once which can create terrible spikes in phosphates and nitrates in your aquarium which can be terrible for your fish.

    Decorations for GloFish Aquarium

    The next thing on the list for setting up a GloFish tank is the decorations. My recommendation for a GloFish aquarium is dark gravel with little hints of coloring. Either completely black gravel or one with a little bit of color. If you plan on keeping plants, a deeper gravel bed will be needed, but otherwise, an inch-deep gravel bed should do just fine. For a 20-gallon fish tank, you’ll probably need anywhere between 10 and 20 lbs. of gravel.

    Image by Jim Zamichieli on wikimedia

    Since we are putting an aquarium together specifically for GloFish having fake plants that will glow under blue lights is recommended. These plants will give the aquarium an “out of this world” feeling. Loading the aquarium with quite a few fake plants is great!

    Adding some hardscape into your aquarium is important. Adding just plants won’t give structure to your fish tank. It is important to have something solid to create a nice structure and shape. Things like rocks, driftwood, sunken ships, and others are fantastic ways to bring your fish tank to life.

    Other Must Have Items

    There are a handful of items that I would recommend having ready to go while setting up your aquarium.

    Test Kits

    The API Ammonia Test Kit and API Freshwater Master Test Kit are important because your new aquarium will be going through the nitrogen cycle. The cycle goes through and once completed will provide the bacteria required to keep your fish safe. The cycle begins with a spike of ammonia. Then that converts to nitrites and lastly, the nitrites get converted to nitrates. You’ll likely know the Nitrogen Cycle is completed when you test for 0 Ammonia and Nitrites and you’ll likely see a hint of Nitrates. The nitrogen cycle normally lasts 6 weeks but the process can be sped up to about two weeks by using a bacteria starter, or media of some sort from an established aquarium.

    Aquarium Water Conditioner

    A water conditioner, like API’s Tap Water Conditioner, is useful to remove chlorine from the water before adding it to the aquarium. Large amounts of chlorine are bad for your aquarium’s inhabitants. API’s water conditioner is fairly straightforward. You will only need to add water conditioner to the water being added. If you change out 5 gallons of water, you only need to add water conditioner for 5 gallons worth of water. You do not need to add water conditioner for the full 20 gallons of aquarium water.

    Gravel Vacuum

    A gravel vacuum, like the Laifoo Aquarium Siphon, will be a must-have when water changes are conducted. The gravel vacuum is probably one of the easiest ways to remove water and clean your gravel. This one specifically is nice because it has a siphon ball which will help create a siphon. This will help you avoid getting a mouthful of water if you decide to start a siphon manually.

    Net, Food, Glass Cleaner

    A net and food are pretty self-explanatory. The net is to make adding the fish into the aquarium easier and the food of course is to feed the fish. Lastly, the glass cleaner will be very useful for cleaning the glass! Algae will form on the glass over time so having an aquarium-safe sponge is beneficial. I sometimes use an old gift card to clean my glass, or I treat myself by using a Melamine Sponge to clean hard-to-reach spots in the fish tank.

    Setup Process

    To begin, place your aquarium in its desired location. Gently begin adding gravel into the aquarium. Be sure not to drop the gravel from great heights because the glass could shatter.

    Since the fish tank is empty, it’s okay to add water conditioner before or after the water is put into the fish tank. While filling the aquarium to about 30% of the water capacity begin brainstorming where to put your aquarium decorations and heater. Once 30% water capacity is reached, begin placing your decorations, and be sure to wedge your hardscape decor a little bit so it is firmly in its place.

    After your decorations are in place fill your aquarium with water to about 90% capacity and place your power filter in the center back of the fish tank. Having it in the center will provide the best performance and circulation. Also, now would be the time to add the heater. Turn the dial to the desired temperature (76 – 78 degrees Fahrenheit) place it and angle it to your preference but be sure it is submerged underwater. Test out the filter and make sure it runs correctly. Once the filter begins to work continue filling the water until the fish tank is filled. Then turn on the heater and set up the light fixture.

    I normally recommend allowing the aquarium to run for at least 24 hours. I do this to make sure all of the equipment is running properly and also just to make sure there are no leaks in the aquarium. I would add API Quick Start to your aquarium. This contains nitrifying bacteria that will be necessary for your new aquarium. It will hopefully speed up the nitrogen cycle and will make your aquarium safer for new arrivals.

    Final Thoughts

    API Quick Start should help you get through your Nitrogen Cycle quickly. I would recommend looking into the Nitrogen Cycle before beginning any sort of aquarium setup. You are working with live animals, so it is important to conduct the proper research before deciding whether to keep them in your home. Unfortunately, many people forget that.

    Lastly, look into adding some snails and/or shrimp to add a clean-up crew after your Nitrogen Cycle has completed. They’re great at eating algae and uneaten food! Otherwise, I hope this guide helps with setting up a brand-new GloFish aquarium!

    Image by Robert Kamalov on wikimedia

  • Wonders of GloFish

    Wonders of GloFish

    GloFish are genetically modified fish that have found their way into the aquarium hobby. The original goal was to modify the fish’s gene so its florescence sparks up when it comes in contact with pollutants in water systems. The fish ended up in the aquarium business and now GloFish can be purchased for your aquarium!

    Types of GloFish

    At the time of this writing, four different species of fish have a pronounced fluorescent gene: Zebra Danio, White skirt Tetra, Tiger Barb, and Red-Tailed Shark. These fish come in a variety of colors and can be found at most pet stores.

    GloFish can be added to a normal aquarium or be in their own “GloFish tank.” I think the effect of their florescence is much cooler in their fish tank. The brightly colored fish, decorations that glow under blue light, and black gravel are a great combination for a GloFish Setup. Keep in mind that research should be conducted on the requirements of each fish before purchase. For example, the Zebra Danio and White Skirt Tetra Glofish are peaceful and perfect for a community tank but the Tiger Barb and Red-Tailed Shark GloFish are considered semi-aggressive and should be in a larger aquarium with different types of fish that can handle aggression.

    GloFish Aquarium Setup Requirements

    For the most part GloFish aquariums can be setup like any old fish tank. They will need gravel, decorations, heaters, a filter and light. As mentioned before, if setting up a GloFish specific aquarium, it is recommended to have decorations that will glow under a blue light. They will add an “out of this world” feeling. LED lights that have a blue light setting are perfect for this type of aquarium build. The blue light is what will give the fish their glow. Other than the lighting and decorations, you would setup a GloFish tank like any other freshwater aquarium. Most keepers do not add live plants because they do not do well under blue lighting. For more information on how to setup a freshwater aquarium, check out this guide.

    Maintenance & Feeding

    GloFish are kept almost like any other fish. The main difference is the lighting that is used to enjoy them. Feeding should be just like any aquarium fish. They should be fed once or twice a day and should be given a variety of food such as pellet food, flakes, and frozen meats.

    Maintenance should also be similar to a normal aquarium. A gravel vacuum should be used to siphon the gravel and about 10% of the water should be replaced weekly to keep the water refreshed and to remove nitrates and phosphates. Having a freshwater test kit handy and testing the water will help guide you to proper aquarium care.

    Final Thoughts

    Every aquarium is unique and GloFish aquariums are a new branch of the hobby with a very quirky style to them. The fish themselves have been around for years and the company behind them keeps adding more fish species and colors for consumers to enjoy.

  • What’s The Deal with Danios?

    What’s The Deal with Danios?

    Danios are quite well known with experienced aquarium keepers but sometimes fall under the radar for newer aquarists. These fish are quite hardy and are excellent for new hobbyists. Although I do not recommend cycling a fish tank with just fish, many people turn to Danios to do just that. They’re cheap and like I said before, very hardy.

    Danio Information

    Many different types of danio can be kept in an aquarium. My personal favorites are the zebra danio and pearl danio. They maintain a smaller size but for being such a cheap fish have a little bit of color to them. Other types of danio that can be purchased are the large giant danio which should be kept in an aquarium with a minimum of 30 gallons, glowlight danio which stays quite small and does well in a 10-gallon aquarium, many longfin forms of a few of these fish, and lastly the GloFish variants of the zebra danio for anyone interested in GloFish. These fish enjoy being in groups of 5 or more so keep that in mind when purchasing them.

    Many hobbyists build aquariums for tranquility and calmness. The one downside to Danios is that they provide just the opposite. These fish are highly active and zip around the fish tank constantly. They have an endless supply of energy it seems. They love heavily planted aquariums that also have open spaces for them to swim through. For the most part, they do find in faster moving water as well as very still water.

    Longfin Zebra Danio by Marrabbio2 on wikimedia

    From experience, danios are quite aggressive eaters and will dart up to the water’s surface to grab food that is given to them. They are not picky eaters and will gladly eat bloodworms, flake food, or pellets. Giant Danios especially have quite an appetite.

    The water parameters range for each species but for the most part, they all range and do well in temperatures ranging 70 – 75 degrees Fahrenheit and pH levels ranging from 6.5 – 7.0. Some Danio species do quite well in temperatures as warm as 78 degrees Fahrenheit and pH as low as 6.0. Be sure to check what is right for the species you are interested in.

    Final Thoughts

    Danio fish are quite wonderful for new aquarium hobbyists and also fish keepers who are looking for movement in their aquarium. I prefer the smaller Danio species because they do not dominate the aquarium as much as the giant danio. These are peaceful fish and are perfect for a community aquarium but their active personalities and aggressive feeding behaviors may get in the way of other fish.

    Celestial Pearl Danio by Gedanken.welten on wikimedia

  • Some Information on Black Neon Tetras

    Some Information on Black Neon Tetras

    Black neon tetras are usually overshadowed by the more well-known Neon Tetra. These fish should catch the eye of aquarium keepers though. They may not have that vibrant blue and red coloring but instead have a black and white bar running down their body which is quite remarkable itself. These fish look fantastic in a well-planted aquarium. If you’re ever browsing through a fish store be sure to check them out!

    Black Neon Tetra Requirements

    Black neon tetras are much more hardy than neon tetras. They are more resilient to changing water parameters such as increased levels of nitrates and pH, but remember that not providing stable parameters can lower the health or possibly kill any fish over time.

    These fish are quite easy to keep happy in an established aquarium. They are community fish and should be kept in a school of a minimum of six other black neon tetras. They have been seen schooling with other similarly shaped tetras so mixing may be a possibility. Black Neons max out at 1.5″ which is a little bit bigger than a neon tetra. They do well in an aquarium that is a minimum of 10 gallons.

    Image by Debivort on wikimedia

    The black neon tetra are not picky to food. They will happily eat flake food, pellets, and or frozen meaty food such bloodworms, brine shrimp, or Mysis Shrimp. They are omnivorous so providing a wide range of food is beneficial to their health. They will not eat live plants in an aquarium! Remember to only feed your fish enough so the food does not end up at the bottom of the aquarium. Uneaten food can become a big problem for an aquarium if left unchecked because it will raise the phosphate and nitrate levels.

    Black neon tetras are best kept in water that is between 72 and 77 degrees Fahrenheit. They also do perfectly well in water with a pH between 5.5 and 7.0. They have quite a large range of water conditions they can live in so they will do well with many other tropical fish.

    Final Thoughts

    Black neon tetras are a great addition to most community tanks. They are peaceful, and small, but have a unique color pattern to them. They are quite abundant in the hobby and can be found at most pet stores. These fish are quite inexpensive as well, usually costing between $1.49 and $1.99.

    Image by Juan R. Lascorz on wikimedia

  • Denison Barb – The Peaceful Barb

    Denison Barb – The Peaceful Barb

    With the large variety of fish that can inhabit a fish tank, it can become overwhelming trying to decide the right ones to put inside to inhabit the enclosure. Especially when hearing about barbs (more specifically) tiger barbs have a reputation for being brutes and aggressive in an aquarium. There are more barbs that are also aggressive but there are some that are nice and gentle. Specifically, the Denison Barb.

    Temperment & Size

    Denison barbs sometimes known as Rose Line sharks look like a dominating force inside of an aquarium but they are one of the most beautiful and gentle animals you can keep. It is of course not recommended to keep them with little fish like neon tetras or ember tetras because they will become lunch, but they’re perfectly welcome in a community aquarium filled with larger peaceful fish.

    Photo by Anandarajkumar at wikimedia

    These fish love to be in larger groups preferably 5 or more fish. Also, do not forget to keep a good lid on your aquarium because these fish are known to be jumpers! Because of their love for being in groups and active personalities, I would not recommend putting this fish in anything smaller than 50 gallons of water.

    The Denison Barb is different from your typical barb. This fish is far longer and more streamlined. They are normally found in fast-moving streams in the wild and appreciate higher oxygen levels in an aquarium. They also grow to be about 4 to 6 inches when they are full-grown.

    Feeding & Aquarium Requirements

    The Roseline Shark will happily take most foods and giving them a large variety of food only benefits them. They will gladly eat bloodworms, fish flakes, pellet food, and algae flakes/wafers/pellets. They are safe to keep with live plants and will not go out of their way to eat them! They’re omnivorous fish so giving them many options will keep them happy!

    They enjoy an enclosure with a pH between 6.8 – 7.8 and temperatures ranging from 60 – 77 degrees Fahrenheit. They should be right at home with other tropical fish because for the most part, their water parameter needs are quite similar. Overall, they are quite easy to care for as long as they are introduced into an established aquarium.

    Final Thoughts

    Denison barbs are incredibly active fish and are insanely beautiful with their gray black and red coloring. They will make any aquarium seem more vibrant and bring new life to the setup. Keep them in nice groups and feed them a variety of food and they should be happy for quite some time! 

    Photo by Anandarajkumar at wikimedia

  • Tiger Barb – Friend or foe?

    Tiger Barb – Friend or foe?

    Tiger barbs are quite a gorgeous little fish. They have beautiful vibrant black, orange, and tan coloration! This is the perfect Halloween-themed fish. They’re also a wonderful centerpiece for many other aquariums because of the dominating presence of swimming in large shoals. Unfortunately, caution must be taken when keeping tiger barbs because they are fin nippers. Male tiger barbs are the primary nippers because they constantly battle with one another to assert dominance. They are considered semi-aggressive fish which may limit which fish they can be mixed with. This guide will try and give some useful information on helping tiger barbs thrive as well as help the fin-nipping problem in your aquarium.

    Tiger Barb Requirements

    Tiger barbs can grow to a size of about 4 inches long. A 30-gallon aquarium is the minimum requirement to keep a tiger barb happy, but anything larger is always appreciated. Setting up a larger aquarium for them will allow them to fade into the background and not be the dominating aspect of the fish tank.

    Keep in mind that they are shoaling fish so they do best in groups of 6 or more. Anything smaller will cause them to be more aggressive than they already are. If they are in a large enough shoal they usually keep to themselves and do not bother fish of a different species.

    It is perfectly fine keeping these fish in temperatures around 76 – 78 degrees Fahrenheit which allows them to be mixed with most other tropical fish. They also do wonderfully in a planted aquarium and are a great addition to one because they like slightly acidic water. Also, having a heavily planted aquarium will help create barriers and hiding places for other fish if the tiger barbs start becoming a little nippy.

    These colorful fish are not very picky when it comes to eating! They are perfectly fine eating flake food, pellet food, blood worms, brine shrimp, and other foods that are introduced into the aquarium. They should normally be fed once a day.

    Photo by ToT89 on Wikimedia.

    Final Thoughts

    Although there are quite a few ways to alleviate a tiger barb’s fin-nipping habit still take precautions if you want to add them to a community tank. To reiterate what was said before: Do not add less than 6 tiger barbs into an aquarium, be sure they are fed, and try to load up your aquarium with decorations to provide barriers and hiding spots. Remember, these barbs are used to fighting for dominance, it is in their nature, so add more tiger barbs and let them keep to their species and pick on one another. These fish should do quite well in a semi-aggressive aquarium but can be problematic in a peaceful, community tank. They’re wonderful to have because of their vibrant colors and active nature but also can become troublesome for new and even knowledgeable aquarists if precautions aren’t taken.

    Photo by Faucon on wikimedia

  • Setting Up a Simple Freshwater Aquarium

    Setting Up a Simple Freshwater Aquarium

    This guide will help brand-new aquarists set up their first freshwater aquarium. This article is relevant for aquariums that are 10 – 30 gallons in size. Aquariums come in all shapes and sizes, with different decorations, plants, filtration systems, and more. This will be a very basic setup guide to help new fish keepers get started. We will cover the steps needed for the actual setup and equipment that can be used for the aquarium.

    Equipment Needed

    To begin, the main equipment needed to keep an aquatic system running are the glass enclosure, heater, filter, and light. These are must-haves, especially if you are just starting. An air pump adds more oxygen but it should not be necessary for this type of setup because the filter will provide enough oxygen for fish to thrive.

    • A submersible heater, like the Aqueon Pro Series Heater, is an excellent option for heating your aquarium because it is made by a very popular brand and is built incredibly well. If you’re not interested in the Aqueon Pro Series Heater, check out some of the Best Submersible Heaters for Freshwater and saltwater Aquariums.
    • A hang-on-the-back filter, such as the Aquaclear Series (power filter) is also a great choice for a filtration system because it allows for chemical, mechanical, and biological filtration. You can check out other Hang-on-back Filters by following the link.
    • LED lights, such as the NICREW ClassLED Aquarium Lights are a good budget light that will open the door for aquatic plants in the future. They provide great lighting, usually last years, and don’t use too much electricity. Make sure the size of the LED light matches the length of your fish tank.

    Decorating & Jump Starting Your Aquarium

    Having a nice gravel bed is a great way to make your fish tank pop! I prefer dark gravel, like this one on Amazon, because that will make the colors of the fish tank stand out more. For first-time aquarists, I usually recommend black aquarium gravel. Just remember to rinse the gravel before putting it into your fish tank. Do not use soap, just water. Adding 1 lb. of gravel for every gallon of water will create a nice deep gravel bed, adding a nice look to an aquarium. However, it’s not necessary to add that much.

    Purchasing decorations is a great idea! There are many different types of decorations such as plastic plants, driftwood, pirate ships, and so on. If you enjoy Halloween, take a look at some Halloween-inspired aquarium decorations. The types of decorations are limitless. I recommend Easy to Care for Live Plants and driftwood to give a natural look, but to each their own.

    A few other things needed for a new aquarium are an API Freshwater Master Test Kit, water conditioner, gravel vacuum, net, and fish food (flake food and pellets), and glass cleaner (sponge or magnetic).

    Setup Process

    The setup process is the fun part of it all. Once you have all your tools and equipment, it’s time to finally put together your new aquarium. I will continue by discussing aquarium placement and decoration recommendations below.

    Aquarium Placement

    Once everything is purchased and ready to go it is time to start setting up the aquarium. Find a location in the house away from windows and air/heating vents. Windows provide more sunlight than needed which will cause algal blooms to occur and air/heating vents may cause temperature fluctuations in the aquarium which is not desirable.

    Adding Gravel & Water

    Gravel and decorations should be rinsed before placing into the enclosure. Once that is done begin by gently putting the gravel at the bottom of the aquarium. Place the water into a bucket and add water conditioner to remove chlorine from it. Usually, 1 drop of water conditioner is added per gallon of water but it may vary so double-check the instructions on the bottle you are using. The water temperature does not matter so much right now but try to eyeball the temperature to be around 74° – 78° Fahrenheit. Fish will not be added yet so an exact temperature isn’t necessary. Repeat these steps until the aquarium is roughly 50 – 75% full and begin adding the decorations.

    Placing Decorations, Equipment & Final Touches

    Push the base of the decorations to the bottom of the gravel bed. This will give it a solid foundation and will help prevent it from moving when cleaning the enclosure. Place the heater and set the temperature to around 76 -78 degrees Fahrenheit. Place the filter in its proper location. Continue to fill up the aquarium to about 90% and test to see if the filter runs. I usually recommend letting the aquarium run for about 12 – 24 hours just to make sure all the equipment runs properly and to ensure there are no leaks. Before adding fish, read up on the Nitrogen Cycle, and the highly recommended fishless cycle.

    Purpose of API Freshwater Master Test Kit

    I will explain the reasoning behind purchasing the other items for your aquarium. The API Freshwater Test Kit is important. The aquarium will go through the nitrogen cycle. The cycle will help create a safe environment for fish and invertebrates. The cycle begins with a spike of ammonia (from waste). The ammonia will convert to nitrites after a week or two. You will use the test kit to follow along. Visible signs of nitrites will appear. After 5-6 weeks, the nitrites should convert to nitrates. When using the test kit, the ideal spot to be in is to test for 0 ammonia and nitrites and have just a hint of nitrates. The nitrogen cycle normally lasts 6 weeks but the process can be sped up to about two weeks by using a bacteria starter.

    Use of Water Conditioner

    A water conditioner is useful to remove the chlorine from the water before adding it to the aquarium. Large amounts of chlorine are not good for fish or invertebrates so removing them is a bonus. Some people allow their water to sit in a bucket for 24 hours before adding it to their fish tank but to be safe the water conditioner is the way to go!

    Supplies For Aquarium Maintenance

    The gravel vacuum will be a must-have when doing maintenance on your aquarium. After creating a siphon, the gravel vacuum will allow water to flow down the tube and into an external bucket. The flow is slow enough to help collect food particles and fish waste but it should not suck up the gravel that was recommended earlier in the article. Using a gravel vacuum makes water changes a breeze.

    The net and food are pretty self-explanatory. The net is to make adding the fish into the aquarium easier and the food of course is to feed the fish.

    Lastly, the glass cleaner will be very useful for cleaning the glass! Algae will form on the glass over time so having an aquarium-safe sponge is beneficial.

    Final Notes

    Aquarium building can be fun while still keeping it simple. Once experience levels increase the hobby can branch out to far reaches. Starting with an easy-to-care-for 10-gallon aquarium creates a good foundation for what could be a lifelong hobby in the future.

  • Neon Tetras – The Schooling Fish

    Neon Tetras – The Schooling Fish

    Neon Tetras are probably one of the most well-known freshwater fish in the hobby. Their vibrant colors pop and stand out from the green background of a planted aquarium. They’re straightforward to acquire and on the cheaper end regarding cost. They’re gorgeous little fish that love to be in schools. This article will provide general information for Neon Tetras.

    Requirements

    Neon tetras are small and stay that way. They max out at a size of around 1.25″. They are perfectly comfortable in an aquarium of 10 or more gallons. Having a large school for them is a requirement. They do not do well alone. A minimum of six neon tetras are recommended but even more, are preferred! They are not picky eaters, but small food must be considered that will fit into their mouths. They will happily eat micro pellets, flake food, or bloodworms. They can live in waters with a temperature between 68° and 78° Fahrenheit but do best at temperatures between 76° and 78° Fahrenheit. These fish are very peaceful and will not bother other fish in an aquarium. Having a well-established aquarium will help these little aquatic animals thrive!

    Due to their smaller size and docile personality, these fish should be kept with other peaceful fish. It is not recommended at all to keep them with larger Cichlids, predatory fish, or aggressive fish. If they are, they will become a quick meal for the larger fish or be beaten up and pushed around by the aggressive fish. Other peaceful and smaller fish are the best neighbors for Neon Tetras.

    Photo by Tan Meng Yoe on wikimedia commons

    More Information

    After working at a pet store for many years I noticed that many people would like Neon Tetras to be the first fish in their aquarium. From experience, this is usually a death sentence for this fish. Neon tetras are not hardy at all. They’re not expensive so it’s an attractive choice for a first fish. Many hobbyists use the first fish in the aquarium to jump-start their nitrogen cycle.

    To quickly sum it up, a new aquarium cycles through three stages. An ammonia stage, a nitrite stage, and ends at the nitrate stage. Fish produce ammonia through their waste and it gets converted to nitrates by bacteria. At low levels, nitrates are less toxic to fish than ammonia and nitrites. The nitrogen cycle transitions through each stage which is very hard on neon tetras. Once, the aquarium runs through this cycle it is safer to introduce the neon tetras. There is plenty of fish that do much better through the cycle such as a smaller species of danio, red phantom tetra, Serpae Tetra, and many others. It is preferred to use a hardy fish for the nitrogen cycle.

    Final Thoughts

    Having a school of Neon Tetras weaving in-between plants, driftwood, and other decorations is a wonderful sight. They’re peaceful and easy to care for once in an established aquarium. Mixing them with other peaceful animals is wonderful and they will do well with shrimp and snails. If you’re looking for other blue colored fish for your fish tank, check out 11 Blue Freshwater Fish for Your Aquarium.

    Photo by H. Krisp on wikimedia commons

  • The Vastness of Aquatic Enclosures!

    The Vastness of Aquatic Enclosures!

    Aquarium Hobby at a Glance

    There are many different types of aquarium-like enclosures a person can have in their home.  They range in all sorts of sizes and levels of difficulty but they are all unique in their own way. From micro enclosures like jarrariums to enormous saltwater aquariums and ponds, there is a niche for everyone! We will broadly talk about many different enclosures for aquatic animals and the level of difficulty of maintaining these enclosures. We will also talk about basic designs and variety in setups.

    Aquatic Jarrariums

    One of the easiest and probably cheapest enclosures for aquatic critters is what is called a jarrarium. A jarrarium can be very simple but also very complex. There are two main types of jarrarium, open or closed. One requires the lid to remain open for oxygen to exchange with water, allowing you to feed the inhabitants, clean the glass, and change the water if it becomes overgrown with algae. The closed jarrarium is filled with inhabitants and sealed in hopes that it will become a self-sustaining system. If built correctly closed systems can be self-sustaining for a few years.

    Eco-Sphere

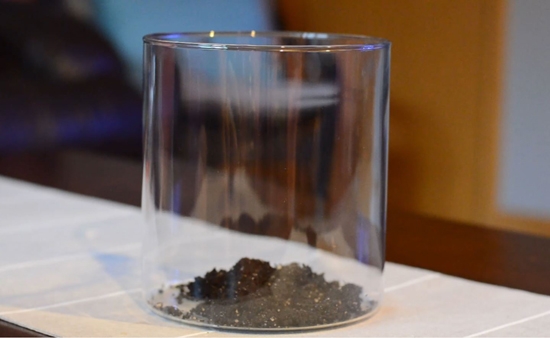
    The most important and expensive item needed for these types of setups is good glass containers that can hold water. For the most barebone jarrarium, a glass container is needed but the only additional material needed is a scoop of water and substrate from your local pond or lake. These water bodies usually are fully loaded with tiny critters such as dragonfly nymphs and snails. This type of jarrarium is called an eco-sphere. Once the water is scooped out, it’ll be quite murky in appearance, but give the loose substrate time to settle at the bottom of the container and it should clear up. Most people do not add any critters into an eco-sphere but instead observe what type of wildlife comes out of the substrate. Eco-spheres help give an insight into many different critters that are in a person’s local water systems. Many of these eco-spheres are short-lived but a great educational piece for kids and adults.

    Open Jarrarium

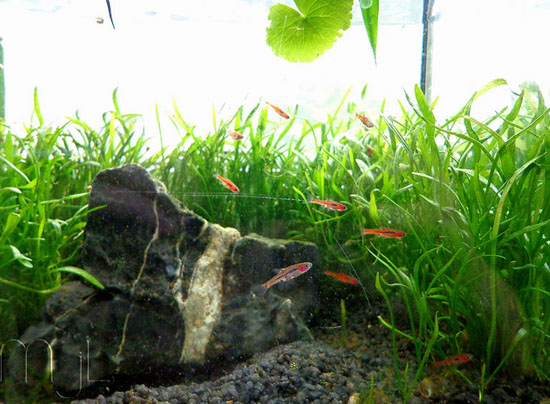
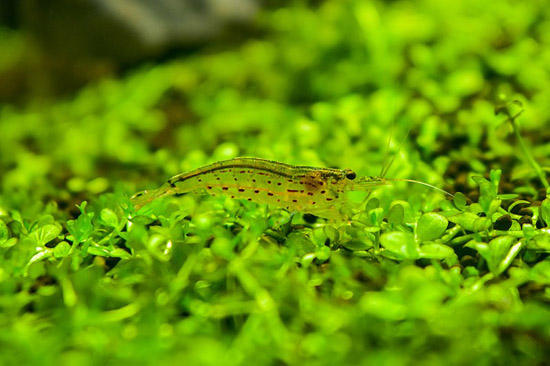
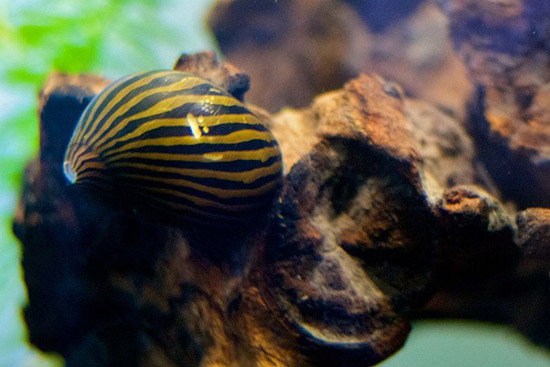
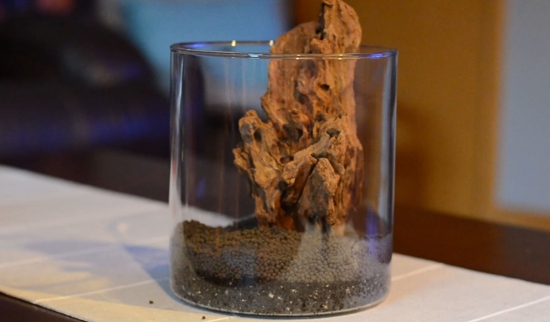
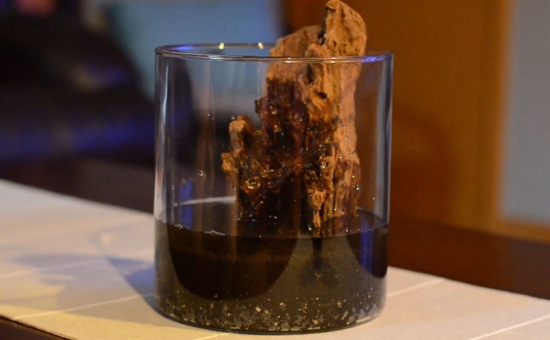
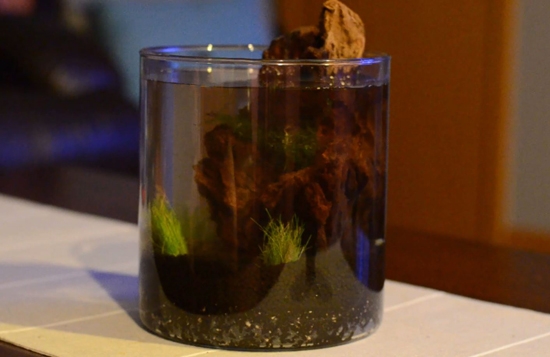
    A regular jarrarium usually consists of a soil part, a substrate part, and then the decor that is placed on top. This type of jarrarium usually takes a bit more planning. The use of live plants and mosses is almost a necessity to help intake nutrients in the water, help prevent algal blooms, and provide oxygen for the animals within. Also, live plants are far more beautiful than their plastic counterparts (in my opinion). The livestock is pretty limited for jarrariums. It is usually limited to shrimp, snails, and possibly a betta fish if the jar is large enough. Shrimp come in many gorgeous colors, varieties, and sizes but on the other hand, be careful with snails because some can infest your newly built jarrarium. The jarrarium placement is very important. Changing room temperatures can harm the critters in their enclosure. Most aquatic animals prefer stable water parameters, such as stable temperatures, otherwise, they can be stressed which can lead to death. The amount of light is also a factor to think about. Too much direct sunlight will cause algal blooms and also raise water temperatures and too little will cause your plants to wither away and die. Consider using an artificial light source such as a CFL light above the jarrarium.

    In my opinion, jarrariums are a very fun, easy, and cheap way to get into the world of aquarium keeping. The cost could be as little as just needing to purchase a glass container, but it can still become a very diverse and unique ecosystem. Some jarrariums look like works of art and are gorgeous pieces of decor in a person’s home or office.

    Freshwater

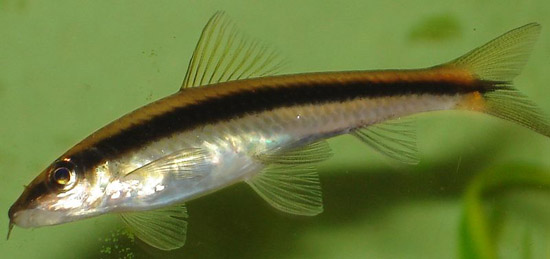
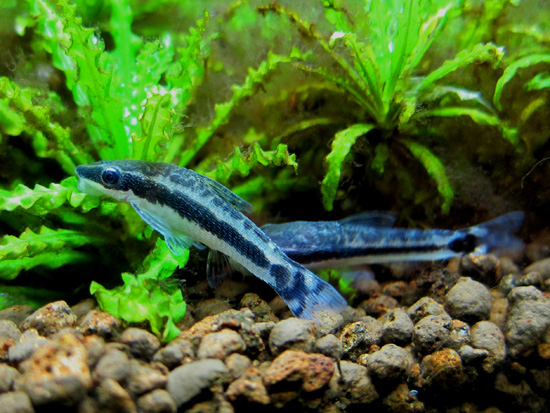
    Next along the lines is freshwater keeping. There are hundreds of different types of freshwater systems a person can put together and it can get a little overwhelming to think about. Different critters require different pH levels, water temperatures, and so on. Also, thinking about live plants will determine the species of fish you can keep. In my opinion, the most important factor to determine the type of fish that can be kept together is the size of the aquarium, and once the size is determined, you can get into deciding what species of fish will be comfortable in that size of an enclosure. I have been in this hobby for ages and worked in the industry. It is terrible seeing fish brought into the store that has damaged or misshapen bodies because they were forced to live in an aquarium that was too small for them.

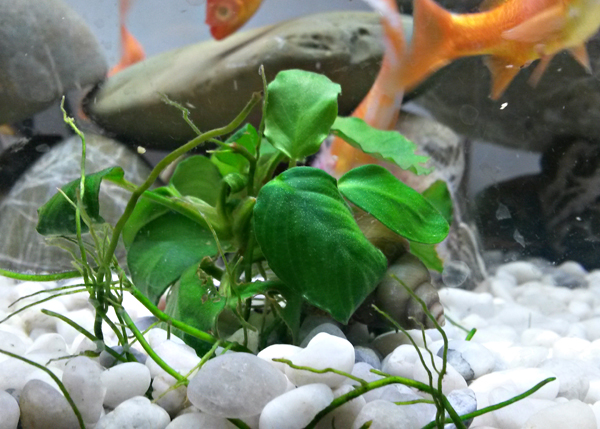
    From experience, a fish won’t stop growing because of the size of the aquarium. The fish’s growth will be stunted and it will cause its overall health to decline. Anyway, once the aquarium size is chosen the next step is to decide on the fish and decor. To start, many choose the simple route of plastic plants and rocky decor which is perfectly fine, but others will decide on getting more in-depth and setting up an aquarium with live plants and mosses. Putting live plants into an aquarium opens up a new can of worms and potentially increases in difficulty of keeping the aquarium running successfully.

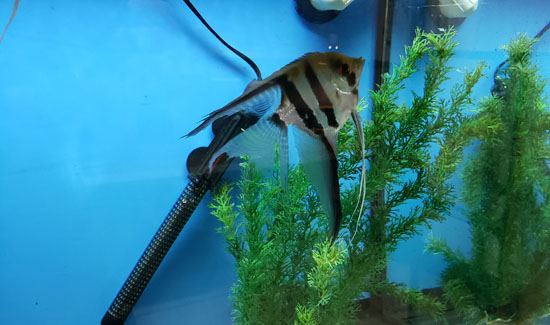
    For ease and simplicity, many fish keepers begin their freshwater journey with fake plants, decor, substrate, hang on the back filter, and a simple LED light. This is the standard aquarium and the easiest route that can be taken. Once interest in the hobby continues, things can branch into more unique niches. Instead of a hang-on-the-back filter, maybe use a canister filter or no filter at all! Instead of a regular old light, a person can try using more intense lights that will give the ability to sustain plant life in the aquarium. The unique alterations that can be made are limitless but we will not be getting into the elaborate details in this article.

    Paludariums

    Paludariums are a little different from a standard aquarium. A paludarium has both a land mass and a water body inside of a glass box. This opens up many doors for hobbyists because now animals such as semi-terrestrial crabs, frogs, or other critters can be added into an enclosure. This type of setup requires a little more knowledge and work to put together. There is quite a bit of planning that must be done before creating a paludarium.

    Unfortunately, the limited size of the paludariums does not allow for species mixing. For example, mixing fiddler crabs with fire-belly toads. There is a great chance they may become territorial in such a small space, see one another as potential food, or just compete for food within the enclosure. This could lead to stressful situations for the animals and possibly put them in dangerous situations.

    There are many things to consider when setting up a paludarium such as: What animal will you be keeping? Do you want water filtration? Do you want a waterfall setup? How deep do you want the water body? How much landmass? What plants do you want to keep? What kind of fish? The questions go on and on, but I am trying to get your mind thinking of some of the considerations that need to be taken for a paludarium.

    Setting up and keeping a paludarium running is more difficult than setting up a freshwater aquarium. It takes far more planning to get the design right and deciding what terrestrial and aquatic animals to put it can be a challenge.

    Terrarium/Vivarium

    Many people use these terms interchangeably but there is a difference between the two. A terrarium is designed to primarily raise plants and a vivarium is used to house an animal. A terrarium can have animals but it can just be a glass enclosure filled with unique and exotic plants. On the other hand, a vivarium is designed to house and recreate an animal’s habitat. Common animals that are placed in vivariums are Dart frogs, geckos, and frogs. Vivariums and terrariums do not have a water body to house fish and other aquatic animals but a vivarium may have a water dish for the critters to drink from. They can be microhabitats or enormous enclosures that fill a whole room’s wall. Terrariums and vivariums are easier to set up and maintain than a paludarium but are a little harder to keep than a freshwater aquarium.

    Saltwater

    There is a lot of intimidation for aquarists that are thinking of transitioning into keeping saltwater aquariums. I would not set up a saltwater aquarium as a beginner hobbyist. I would gain knowledge about a freshwater aquariums, dip my toes in live plants, and research saltwater aquarium setups and keeping. Once all that experience and knowledge is gained, only then would I consider setting up a saltwater aquarium. Keeping a saltwater aquarium is not that hard. Keeping it well is where the challenge is and the cost of setup and maintaining it is what scares many away. Try freshwater and if you enjoy fish keeping consider setting up a saltwater aquarium.

    The two primary niches of keeping saltwater aquariums are reef tanks or fish only. Many who set up reef aquariums are doing it to end up growing coral in their aquarium. There are many critters in the saltwater hobby that are not compatible with reef aquariums. For example, pufferfish wholeheartedly love devouring hermits and snails that would normally be found in a reef. Parrot fish will graze down your stony coral with ease. There are starfish and urchins that will also destroy a reef system. These are just a few examples of incompatibilities between animals. Decide what fish you would like in your aquarium and that will determine whether a reef tank is good for you.

    Fish Only Aquarium Setup

    Fish-only aquariums will not have corals and may or may not do well with crustaceans. Predatory aquariums are usually why hobbyists do not build a reef aquariums. Common critters that are put into fish only systems are angelfish, lionfish, eels, pufferfish, parrotfish, wrasses, stingrays, and many more. This type of setup will need a large filter because of the dietary needs of most of the animals. A sump system is recommended with a very good protein skimmer. Usually predatory aquariums and fish only setups are large (125+ gallons). This is because many of your predatory fish get very large.

    Reef Aquarium Setup

    Reef aquariums are quite different. They need good lights for corals, they will have crustaceans, and they can be very small or very big. I would still recommend a sump system with a protein skimmer for reefs but I would also look into setting up a refugium in your sump for additional filtration. Larger systems are easier to maintain but there is quite a fondness for nano reefs as well.

    There are many different types of coral which broaden the spectrum even more. SPS corals need pristine water conditions so are usually kept in an SPS reef aquarium, while other corals like zoas and leathers do need specific parameters and can be put into a mixed reef or a species-specific aquarium of their own.

    There are hundreds of different reef-compatible fish and crustaceans. I will not be going into the details of this because there are so many. Think of the type of fish you would like and research what size fish tank it requires and whether it is reef safe. Also, check the temperament of the fish. Many are very peaceful but others will get territorial. These are the main parameters for these fish.

    Saltwater aquariums will easily cost an aquarists hundreds to thousands of dollars to set up. Reef systems are especially costly due to the lighting needs and the addition of quite a bit of live rock. That is why making sure this hobby is for you is important before walking down this path. Saltwater aquariums are for hobbyists who know a thing or two about aquariums and understand how water systems work.

    Ponds

    Ponds are not as common in the hobby as the others. Many people do not have a yard large enough for a pond. Regardless, they are a great place to relax. The primary fish kept in a pond is a koi fish. They are very similar to goldfish but are usually longer and grow larger. Their colors are magnificent! Other animals that may naturally come around ponds are frogs and turtles.

    Ponds also can have different plant matter growing in them. Lillies and floating water lettuce are two that come to mind that is quite commonly found in home ponds. They are a nice addition and provide cover for your fish from predators such as raccoons and herons. Also adding a little bit of green color never hurt.

    There are many things to consider when setting up a pond. They can get quite expensive. Picking a location is important. More sunlight will lead to more algae growth in your pond but also too much shade may cause other plants from flourishing inside. During the initial setup, choosing a pond liner is very important. A durable liner may cost more at first but will hopefully prevent leaks from happening which will save you money and stress in the long run. A waterfall feature will add great aeration to the pond but a pond pump costs a lot of money! Think about other aerating fixtures to get oxygen into your system.

    The following is more dependent on where you live. In the United States, the Midwest goes through four seasons. Pumps need to be shut off for the winter, koi need to be either taken inside or fattened up for the winter, springtime will lead to pond cleaning, and so on. The pond needs to be deep enough for fish to be kept in there through winter. These are obstacles that need to be overcome in the Midwest but it’s not as big of a problem in warm states like Florida or Arizona.

    Ponds are wonderful! They are a great place just to cool down and enjoy nature in your backyard but they are quite difficult to maintain and can be costly. The chance of losing a fish to predators is unfortunate but it’s a risk that is taken by pond keepers due to its beauty! Quite a bit of research and preparation should be conducted before setting up a pond!