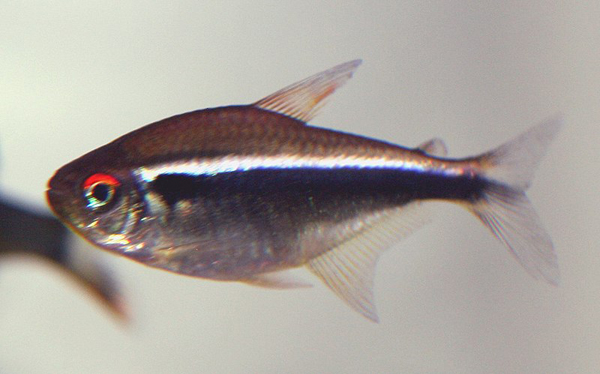
Black neon tetras are usually overshadowed by the more well-known Neon Tetra. These fish should catch the eye of aquarium keepers though. They may not have that vibrant blue and red coloring but instead have a black and white bar running down their body which is quite remarkable itself. These fish look fantastic in a well-planted aquarium. If you’re ever browsing through a fish store be sure to check them out!
Black Neon Tetra Requirements
Black neon tetras are much more hardy than neon tetras. They are more resilient to changing water parameters such as increased levels of nitrates and pH, but remember that not providing stable parameters can lower the health or possibly kill any fish over time.
These fish are quite easy to keep happy in an established aquarium. They are community fish and should be kept in a school of a minimum of six other black neon tetras. They have been seen schooling with other similarly shaped tetras so mixing may be a possibility. Black Neons max out at 1.5″ which is a little bit bigger than a neon tetra. They do well in an aquarium that is a minimum of 10 gallons.
The black neon tetra are not picky to food. They will happily eat flake food, pellets, and or frozen meaty food such bloodworms, brine shrimp, or Mysis Shrimp. They are omnivorous so providing a wide range of food is beneficial to their health. They will not eat live plants in an aquarium! Remember to only feed your fish enough so the food does not end up at the bottom of the aquarium. Uneaten food can become a big problem for an aquarium if left unchecked because it will raise the phosphate and nitrate levels.
Black neon tetras are best kept in water that is between 72 and 77 degrees Fahrenheit. They also do perfectly well in water with a pH between 5.5 and 7.0. They have quite a large range of water conditions they can live in so they will do well with many other tropical fish.
Final Thoughts
Black neon tetras are a great addition to most community tanks. They are peaceful, and small, but have a unique color pattern to them. They are quite abundant in the hobby and can be found at most pet stores. These fish are quite inexpensive as well, usually costing between $1.49 and $1.99.
This guide will help brand-new aquarists set up their first freshwater aquarium. This article is relevant for aquariums that are 10 – 30 gallons in size. Aquariums come in all shapes and sizes, with different decorations, plants, filtration systems, and more. This will be a very basic setup guide to help new fish keepers get started. We will cover the steps needed for the actual setup and equipment that can be used for the aquarium.
Equipment Needed
To begin, the main equipment needed to keep an aquatic system running are the glass enclosure, heater, filter, and light. These are must-haves, especially if you are just starting. An air pump adds more oxygen but it should not be necessary for this type of setup because the filter will provide enough oxygen for fish to thrive.
A hang-on-the-back filter, such as the Aquaclear Series (power filter) is also a great choice for a filtration system because it allows for chemical, mechanical, and biological filtration. You can check out other Hang-on-back Filters by following the link.
LED lights, such as the NICREW ClassLED Aquarium Lights are a good budget light that will open the door for aquatic plants in the future. They provide great lighting, usually last years, and don’t use too much electricity. Make sure the size of the LED light matches the length of your fish tank.
Decorating & Jump Starting Your Aquarium
Having a nice gravel bed is a great way to make your fish tank pop! I prefer dark gravel, like this one on Amazon, because that will make the colors of the fish tank stand out more. For first-time aquarists, I usually recommend black aquarium gravel. Just remember to rinse the gravel before putting it into your fish tank. Do not use soap, just water. Adding 1 lb. of gravel for every gallon of water will create a nice deep gravel bed, adding a nice look to an aquarium. However, it’s not necessary to add that much.
Purchasing decorations is a great idea! There are many different types of decorations such as plastic plants, driftwood, pirate ships, and so on. If you enjoy Halloween, take a look at some Halloween-inspired aquarium decorations. The types of decorations are limitless. I recommend Easy to Care for Live Plants and driftwood to give a natural look, but to each their own.
A few other things needed for a new aquarium are an API Freshwater Master Test Kit, water conditioner, gravel vacuum, net, and fish food (flake food and pellets), and glass cleaner (sponge or magnetic).
Setup Process
The setup process is the fun part of it all. Once you have all your tools and equipment, it’s time to finally put together your new aquarium. I will continue by discussing aquarium placement and decoration recommendations below.
Aquarium Placement
Once everything is purchased and ready to go it is time to start setting up the aquarium. Find a location in the house away from windows and air/heating vents. Windows provide more sunlight than needed which will cause algal blooms to occur and air/heating vents may cause temperature fluctuations in the aquarium which is not desirable.
Adding Gravel & Water
Gravel and decorations should be rinsed before placing into the enclosure. Once that is done begin by gently putting the gravel at the bottom of the aquarium. Place the water into a bucket and add water conditioner to remove chlorine from it. Usually, 1 drop of water conditioner is added per gallon of water but it may vary so double-check the instructions on the bottle you are using. The water temperature does not matter so much right now but try to eyeball the temperature to be around 74° – 78° Fahrenheit. Fish will not be added yet so an exact temperature isn’t necessary. Repeat these steps until the aquarium is roughly 50 – 75% full and begin adding the decorations.
Placing Decorations, Equipment & Final Touches
Push the base of the decorations to the bottom of the gravel bed. This will give it a solid foundation and will help prevent it from moving when cleaning the enclosure. Place the heater and set the temperature to around 76 -78 degrees Fahrenheit. Place the filter in its proper location. Continue to fill up the aquarium to about 90% and test to see if the filter runs. I usually recommend letting the aquarium run for about 12 – 24 hours just to make sure all the equipment runs properly and to ensure there are no leaks. Before adding fish, read up on the Nitrogen Cycle, and the highly recommended fishless cycle.
Purpose of API Freshwater Master Test Kit
I will explain the reasoning behind purchasing the other items for your aquarium. The API Freshwater Test Kit is important. The aquarium will go through the nitrogen cycle. The cycle will help create a safe environment for fish and invertebrates. The cycle begins with a spike of ammonia (from waste). The ammonia will convert to nitrites after a week or two. You will use the test kit to follow along. Visible signs of nitrites will appear. After 5-6 weeks, the nitrites should convert to nitrates. When using the test kit, the ideal spot to be in is to test for 0 ammonia and nitrites and have just a hint of nitrates. The nitrogen cycle normally lasts 6 weeks but the process can be sped up to about two weeks by using a bacteria starter.
Use of Water Conditioner
A water conditioner is useful to remove the chlorine from the water before adding it to the aquarium. Large amounts of chlorine are not good for fish or invertebrates so removing them is a bonus. Some people allow their water to sit in a bucket for 24 hours before adding it to their fish tank but to be safe the water conditioner is the way to go!
Supplies For Aquarium Maintenance
The gravel vacuum will be a must-have when doing maintenance on your aquarium. After creating a siphon, the gravel vacuum will allow water to flow down the tube and into an external bucket. The flow is slow enough to help collect food particles and fish waste but it should not suck up the gravel that was recommended earlier in the article. Using a gravel vacuum makes water changes a breeze.
The net and food are pretty self-explanatory. The net is to make adding the fish into the aquarium easier and the food of course is to feed the fish.
Lastly, the glass cleaner will be very useful for cleaning the glass! Algae will form on the glass over time so having an aquarium-safe sponge is beneficial.
Final Notes
Aquarium building can be fun while still keeping it simple. Once experience levels increase the hobby can branch out to far reaches. Starting with an easy-to-care-for 10-gallon aquarium creates a good foundation for what could be a lifelong hobby in the future.
Manage Consent
To provide the best experiences, we use technologies like cookies to store and/or access device information. Consenting to these technologies will allow us to process data such as browsing behavior or unique IDs on this site. Not consenting or withdrawing consent, may adversely affect certain features and functions.
Functional Always active
The technical storage or access is strictly necessary for the legitimate purpose of enabling the use of a specific service explicitly requested by the subscriber or user, or for the sole purpose of carrying out the transmission of a communication over an electronic communications network.
Preferences
The technical storage or access is necessary for the legitimate purpose of storing preferences that are not requested by the subscriber or user.
Statistics
The technical storage or access that is used exclusively for statistical purposes.The technical storage or access that is used exclusively for anonymous statistical purposes. Without a subpoena, voluntary compliance on the part of your Internet Service Provider, or additional records from a third party, information stored or retrieved for this purpose alone cannot usually be used to identify you.
Marketing
The technical storage or access is required to create user profiles to send advertising, or to track the user on a website or across several websites for similar marketing purposes.